

Lets start with a relatively easy one but a mixing style that so many DJs still get wrong.
Your goal is to mix two tracks seamlessly together. Bringing in the beat, the percussion and eventually the bass-line, riffs, harmonies and vocals if there are any.
You can’t just fade in one track over another. This wont create a seamless effect and will usually just make a slightly jarring mixture of sounds, even if you’ve perfectly beat-matched the two tracks.
There are a wealth of filters and effects that can help you seamlessly mix the tracks but there are a few things to think about first.
- Is the musical genre similar?
- Do the two tracks have ample mix-in and mix-out zones for you to play with?
- Do the instruments and sounds in the tracks compliment each other?
All of this comes from analysing the tunes in your record box before you try mixing them.
DJs generally group their tracks in to complimenting groups of 3 so try to organise yours this way. You can often colour code them in your playlists or set ratings and comments so you know which tunes work best with others.
While its possible to mix musical genres you’ll usually find creating a seamless mix works best when the musical style is the same.
The mix-in and mix-out zones are the opening and closing parts of tracks where layers are either added slowly over the first 1 or 2 minutes, or are slowly stripped away over the last 60 seconds or so of a track.
Seamless mixes work best when percussion and instruments within a track slowly build and are either in a complimentary musical key or can be overlaid without causing conflicting soundscapes. You’ll know this from playing your tracks back to back. Also try playing parts of them over each other to see how good or bad they work together.
Once you’ve done this its time to try your seamless mixing by making use of multiple dials and faders on your mixer.
Here are the best tools to use

High frequency volume
This will reduce any percussion in your tracks, usually high-hats, snares and cymbals. Resulting in a smoother sound that lets the percussion in your master track take president.
You can start with a very low volume and gradually increase during the mix-in zone.
Once you’ve reached around 80% volume you can start to decrease the high frequency volume of your master track. Letting the new track take over the dominance.
Mid frequency volume
The riffs, harmonies, stabs and some of the percussion like bongos and tom toms sit in this range. Much of the vocals do also but its best to avoid vocals when mixing two tracks together, You should have completed much of your mix before the vocals kick in.
Slowly fading in the mid range frequencies will take some of the punch out of your incoming track. Handy if the tune has some dominating audio features to it.
I would recommend only bringing in around 70% max until you’re ready to hand over dominance to the new track.
Generally you’ll notice less of a difference in the last 30% range compared to removing high and low frequencies but psychologically a lot of the “control” of a track sits in the middle.
The effectiveness of playing around with mid-range volumes depends entirely on the tracks you’re mixing with.
Deep house and drum & bass tunes often have limited use of this region within the mix-in and mix-out zones when compared to the likes of EDM, techno and hip-hop.
Low frequency volume
Here you’ll find the bass-line and the kick-drums of your tune. So knocking these out will allow the meaty bass sounds of your master track keep their dominance. Its also where most of the clipping can happen when you have two tracks at 100% volume.
So reducing the incoming track’s low frequency will help create a smoother mix. This applies to nearly all mix techniques, basic and advanced.
Generally your audience wont notice which kick drums are from which track so you can play around more with the low frequency volumes. Unlike high-frequencies I tend to reduce the master track’s bass around the same rate as I increase the incoming track’s bass.

There’s less audio characteristics in this region compared to mid and high frequencies so you’ll probably notice less of an impact.
Having said that you’ll want to listen carefully to make sure you haven’t reduced the overall bass levels that your audience are hearing. You’re looking for a seamless mix where one bass-line takes over from another.
Filters and effects
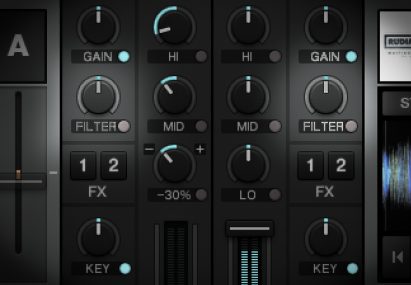 These are generally down to personal DJ style and preference but can be used in small amounts to create softer incoming sound. The “Filter” effect is often too harsh and creates a rather predictable effect so try not to use it too much.
Useful effects you might want to consider are Reverb and Gater which can wash your incoming audio with smoother sound and also cut out high impact sounds making them that’s less punchy.
Once you’ve mastered these controls and know what tracks work best for the seamless mix technique its time to get mixing.
Starting your seamless mix
As your master track is coming to a close and entering the mix-out zone start your incoming track at your desired cue point. With its channel volume on 0% and your low, mid and high frequencies around 10% start to fade in your track.

Listen out for the faint characteristics of the new track, monitor their impact on the overall sound. Slowly bring up the channel fader to around 50-60%. Now focus on bringing in more of the low, mid and high sounds.
You can apply effects at the start but you’ll want to reduce these as you build volume levels. Removing the washed out sound.

I’d recommend starting with the high frequencies first. Adding in some of the percussion from your new track. Try to do this in increments at the start of 4 beats and preferably after 16 beats half elapsed. Add mid frequencies too, don’t remove any high or mid frequencies from the master track yet.
Slowly increase the master fader to around 75% and also increase the low-frequency volume. When you hit around 20% low frequency volume start to reduce the master track’s low frequency volume at a similar rate to the incoming track’s adjustment.

Increase the channel fader to near 100% as you hand over dominance of high, mid and low to the new track. Your original master track should by now have increasingly reduced high, mid and low frequency volumes. All at different levels depending on the sounds within your tracks.
There’s no need to use the channel fader here as you’ve effectively reduced the channel’s volume anyway.

Within 30-60 seconds you should have your new track dominating your old one by seamlessly adjusting levels and effects. Depending on the contents of your songs you can often leave the now reduced original track playing until a natural break in your track.
Another quick tip, if the mix-in or mix-out zones aren’t long enough for your liking consider created loop hot-cues to extend their run time, giving you more time to create the perfect seamless mix.
As you’ve probably gathered this process takes a lot of practice, a lot of live analysis and a lot of control adjustments to get it just right, but the mix effect is incredible when you get it just right.
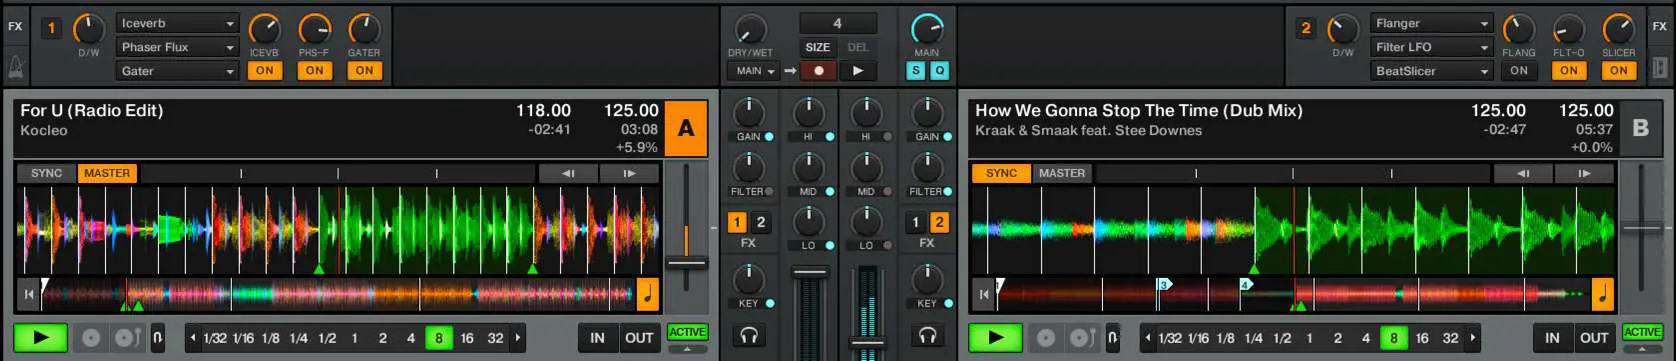
An example of seamless mixing
To help you understand just how powerful seamless transitions can be we created a mix that not only features back to back seamless mixes it also attempts to make them continuous! Each track transitions in almost immediately after the last transition was completely. This creates a very seamless feel throughout the mix. Aided by harmonic mixing too where each song is in the same key.
Add percussion loops to be more creative
You can improve seamless mix transitions even further by playing percussion loops over your tracks, this helps bridge the two together creating a musical element that spans both tracks. The ultimate seamless mix experience! Grab our free percussion loops to give it a try and then get our Pro package for even more loops you can use with your mixes.
I touched on this mixing style briefly in the last chapter as a way to extend your mix-in and mix-out zones. But the Infinite Loop Mix technique takes it to a whole new level.
The idea here is that specific sections of your tracks are great for looping. They don’t have to be within the mix-in or mix-out zones of your tracks. They can be anywhere and include any sounds you like.
The best way to discover them is by jumping to a section of your track and setting a loop in motion.
Try adjusting the size of the loop from 16 beats down to 4 beats, 1 beat, 1/2 a beat and even less to see what sounds work well as loops.
Create loop hot cues near the start and end of your tracks. Also create hot-cues to jump to when you’re finished mixing and want to just continue your track.
You don’t have to be quite so seamless with this mix technique although you can if you like. I recommend adding some effects to your incoming track to reduce its initial impact and make your short loop become more like an evolving soundscape that compliments the master track.
Effects that work well with loops..
- Beatmasher – It rearranges your loop sample in to chunks, creating whole new loop sounds you can adjust easily
- Flanger – Use sparingly but can add a nice effect over the incoming track, be sure to remove fully before you complete your mix
- Gater – Usually in conjunction with other effects. Handy for knocking out parts of your loop. Don’t use fully “wet”, around 60% is good
- Filter with LFO – Great for creating a swirling background sound to compliment your master track
- Iceverb or Reverb – Great for washing out your loop, reducing its impact.
How to perform the mix
With your master track playing, preview your incoming track in your headphones, apply some effects to it to give it a unique and less punch sound. Then slowly fade in the loop to around 50% over the course of 16 to 32 beats.
Or alternatively drop it in at 50% right on the 1st beat of a 16 beat group. This will give your master track a background looping effect which you can now play with.
You can now play around with the effects to create new exciting sounds that add texture to your master track. Adjust the beat-mashing effect to see what new arrangements work within the loop as well.
To complete the mix you’ll now want to reduce the effects, increasing high, mid and low frequency volumes while reducing those in the master track. You can also disable the loop or jump to a hot-cue point to continue your track.
For added infinite looping you could now drop the outgoing tracking in to a loop, adding effects until it becomes the background texture for the incoming track.
Most DJs avoid doing this as it adds a fair bit of complexity to your mix. But this advanced mix technique can be aurally exciting and show of your DJ skills too.
Essentially you want to mix two tracks of different tempos together with a transition period where you adjust the tempo of both tracks.
Your master track will be playing at around its original speed, so depending on the tempo of your incoming track you’ll either need to slow down or speed up the tempo of the incoming track.
Preparing your DJ software
Most DJ software is set up to offer a tempo range of 16%. This goes back to the days when vinyl turntables offered 8% pitch range each direction (8% faster and 8% slower).
Thankfully with advent of digital DJ hardware and software you can push the tempo range well beyond 8% and you’ll need to in order to pull off this advanced mixing trick.

Go in to the settings of your software and look for settings related to “Transport” or “Decks”. Hopefully you’ll see an option for modifying the “tempo range”.
In Serato you can do this by holding down the shift button and clicking on the “tempo” option above the pitch fader.
You’ll need to adjust the pitch range to at least 50% if you want to blend tracks between something like a house / EDM tempo of 130 GBP to a drum and bass or techno tempo of 160 – 180 BPM.
Also make sure you have “Key lock” enabled. You want to change the tempo of the tracks rather than the pitch. Locking the key will preserve the original key of the track and make the mix much more seamless.
Performing the mix
This isn’t an easy mix to pull off as you’ll need to perform a lot of actions to make it possible. As an example lets go from a house track to a drum and bass track. So from 125 BPM to 173BPM.
First you need to beat match or sync the incoming track to your master track. So in our example this is slowing down the drum & bass track to 125 BPM.
Use your headphones to check this sounds right and is perfectly in sync. You’re stretching out the kick drums and percussion to perfect syncing is key to a good mix here.
Next you’ll want to loop the master track at a good point where the’s not too much going on within the music. Usually during the mix-out zone so that you’re creating an easily mixable infinitely looping section.
This is important for two reasons.
- You want plenty of time to mix the two tracks and hand over to the new track
- Your outgoing track will increase in tempo by some 20-30% so you’ll soon run out of music if you’re not looping
Start your incoming track, you can loop a section now if you need more time to perform the mix.

Slowly fade in your incoming track, you can reduce the low and mid frequencies if you want the mix to feel more seamless. Unlike the seamless mix technique you want to show off the incoming track as you’ll soon be adjusting the tempo.
This can sound weird if your master track starts to speed up without it being clear there’s a new track playing.
Here’s where it gets tricky.
- Your master track needs to be set to “master” tempo while your incoming track is set to “sync”
- Switch your incoming track to “master” tempo mode, or disable sync mode (make sure the tempo doesn’t change)
- Switch your outgoing track to “sync” tempo mode so that it will follow the tempo change of your incoming track
- Slowly increase the tempo on your incoming track. Your outgoing track should adjust at the same speed, keeping them perfectly in sync

You’ll also want to monitor how this sounds to your audience, adjusting the outgoing track’s channel volume and removing the low frequency first to drop out the kick drum of the house tune, letter the bass-line and percussion of the incoming track take over.
You can now add effects to your outgoing track to add some texture while reducing its overall volume to a background level, before dropping it out completely when you’re done with the mix.
Well done! You’ve successfully switched tempo from 125 BPM to 173 BPM.
This doesn’t work for every track but with the help of loops, effects and lots of experience using the tempo controls of your DJ software its achievable. Not easy but definitely an awesome way to ramp up energy in the room!
A demonstration for you to listen to
Mixing from fast tempo to slower tempo
While you can perform this mix in the other direction, from 173 BPM down to 125 BPM the amount of blending and filtering you do will change. In my example of house and drum & bass your outgoing track is now a fast paced intense percussion sound, while your incoming track is likely to be beats, funky bass-lines and melodies.
If you drop out the outgoing track too quickly the sound can be quite jarring. So for this I recommend you leave the outgoing track playing for longer in the background.
Dropping out the low and mid frequencies and reducing the channel volume but keeping the high frequency percussion as a background texture to your new track.
At least until the optimal moment when you can remove it completely. Usually when a break comes in.
This mixing technique works for almost all genres of music, whether you’re speeding up or slowing down. Just remember to lock the keys, switch the master and sync modes and practice what works best for the two tracks you’re trying to mix.
This is currently one of my most interesting mix transitions I like to perform while DJing. Partly because it gets such a strong reaction from the crowd.
If you’ve never heard of Polyrhythmic mixing before let me educate you. Music has a timing structure which for most modern music is 4:4. This is 4 sections of 4 beats. Almost all music uses this rhythm making it easy to mix between songs.
But not all sounds within songs have to stick to this structure. Some sounds can contain only 3 beats before looping. Creating an interesting offset pattern that seems to stay in phase with the music while repeating on its own timing.
You can add this sound to the track that’s playing by finding a sample you want to loop and setting its length to something other than its original length of multiples of 4 beats. Most DJ software by default tries to give you loops in one rhythm, 1 beat, 2 beats, 4 beats, 8 beats, 16 beats or 32 beats. These are great but they’re kind of predictable too!
An example of Polyrhythmic mixing
To better understand what Polyrhythmic sounds like here’s a great example featuring a number of Polyrhythmic sounds from one of my favourite scratch DJs.
Now you can see how you can fit different rhythms together to create an ever rotating sample that skews the sound without going out of sync. You can have so much fun with this mixing style and really energise a crowd as the rhythm takes hold of them.
How to perform a Polyrhythmic mix
The best way to start a polyrhythmic mix is to have a beat playing, maybe with some percussion and some background bass line. Nothing to strong and in the foreground as we need space for our loop to take dominance.
Now pick your sample you want to loop. It could be a synth sound or a short acappella sound, maybe a sound bite from a rapper. All of these work well as polyrhythmic loops.
Find the short 4 beats of sound you want to loop. By default your DJ software will most likely set it to 4 beats. They all work this way so don’t be surprised when the sound is not polyrhythmic.
Now you need to reset the loop size to 3 beats instead of 4. Some DJ software may offer this option in the list of loop sizes, while others you’ll need to look in the settings to enable it.
If your DJ software doesn’t have a 3 beat loop option you’ll need to manual select the length of your loop by resizing it and playing it over and over in your headphones to preview it and make sure it sounds sync-ed up.
If your DJ software supports quantizing I recommend leaving this on as it will help snap the first beat of the 3 beat sample to the the nearest beat of the other track you have playing. This should keep it nicely syncronized.
I recommend previewing the mix in your headphones first by setting the mix level so you can hear the playing percussion track and your 3 beat sample loop together. If you’re happy with the sound then stop the loop and get ready to perform your mix.
You now need to count in either 16 or 32 beats of your playing track so you bring in your loop at the right time. You can just fade it in but that often sounds too subtle. It may have more impact if you suddenly start it on the 1st of 16 beats.
Start the sample and listen to how it loops over and over in a 3 beat pattern but in sync with your 4 beats. This is sure to have an impact on your crowd as the sound will stick out and add a whole new style of rhythm.
You can add effects to the sound too, maybe filter to start with and reduce that to bring the loop to the foreground. Flange can work well too, even delay echo is a fun one to play around with. I always say less is more when it comes to effects as you can wash out the sound more than enhance it if you add too much.
Now your loop is looping you need to transition in to another track. You have 2 options here.
Transition option 1
If the loop is part of the track you want to bring in then you can jump to a hot cue you have set that is at another part of the track.
Wait until the end of 16 or 32 beats and on the 1st beat of the next set of 16 beats hit the hot cue jump button and you’re instantly out of the 3 beat loop and back to playing the track.
So easy!
Transition option 2
Another option is to have more than 2 decks playing at once.
Deck 1 was your original track, Deck 2 is your polyrhythmic loop, now Deck 3 needs to be the new track you’re bringing in to the mix.
Makes sure you know how to beat match to get the track sync-ed up quickly and confidently. Then replace the original track with your new track.
You still have your polyrhythmic loop playing to bridge the outgoing and incoming tracks, adding an extra layer of DJ mixing skills to your advanced DJing prowess!
Modern DJ software can analyse the musical key in which your track is produced, allowing you to sort your tunes by key and mix them together.
While this DJ mixing method is relatively easy to explain its by no means easy to achieve. But it can create fantastic mixes if you can pull it off.
Preparing your DJ library
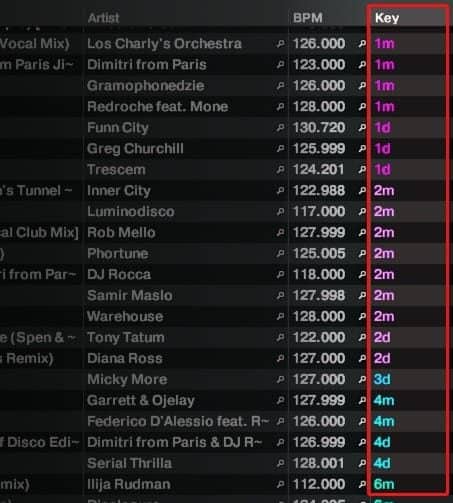 First you’ll want to build a playlist of your tunes and make sure your software has analysed all the tracks for key. You’ll see the key displayed in the library browser.
If its not showing, right click on the column headings of the library browser and select “key” from the list of available columns.
Sort the tracks by the key column. If your software is clever enough it’ll sort them well so that you’ll see exact matches next to each other and colour code for easy identification.
The easiest mixes will be tracks with exact matches. Two tracks both in 2d or 4m will mix harmonically perfectly without any key adjustment.
You’ll also want to enable key locking as you’ll be adjusting the tempo of your incoming track and don’t want to affect the key of the song.
Building playlists with complimenting keys
While DJ software can sort songs by key in a library it wont help you build a playlist of awesome songs that easily. You’ll need an external service to help inspire you with songs that are either in the same key or a similar one. We’ve written an in-depth review of one such service that tells you all about how to find the key of songs for DJ-ing. Its free to use so worth checking out.
Performing mixes with complimenting keys
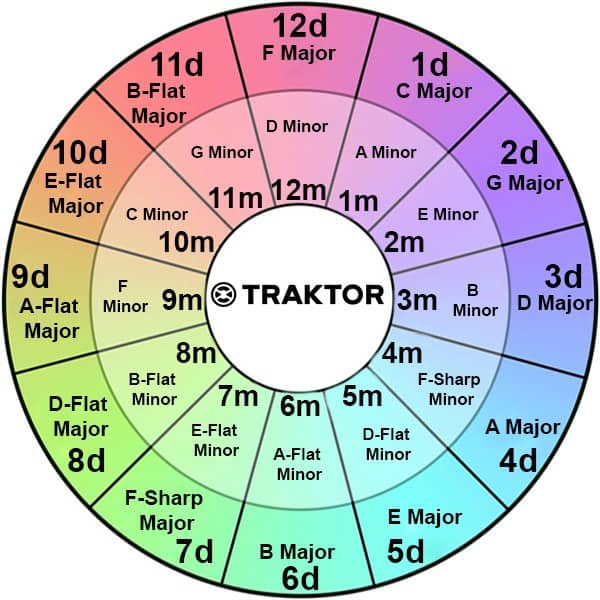
If you want to mix tracks that harmonise perfectly there’s two simple rules. Firstly you can just subtract or add 3 or 6 to the number shown while keeping the same number.
So a track listed as 2M will harmonise with 5M and 8M. Similarly 1d will work with 4d and 7d.
Give it a go with some of the tracks in your collection. For the most part this works well and certainly improves the musical quality of a mix if the certain instruments compliment each other.
You’ll soon notice this doesn’t work perfectly for every track. That’s because some instruments and effects in music production are de-tuned on purpose to create new and interesting textures.
Some tracks might have key changes which will mess with your mix, others blend keys together that may not work with your incoming track.
To master DJ key mixing you’ll need to listen to your tracks, analyse the best places for loops and mix-in and mix-out zones, experiment and rehearse so you know exactly how to mix your tracks in perfect harmony. Find out much more about harmonic mixing and mixing with keys in our in-depth article on the subject.
If you’re using Traktor DJ software then I recommend taking a look at this image which shows you exactly which keys mix together. Think of this like a clock face. Any 2 keys within the same “hour” will mix harmoniously.
Also any hours opposite each other will and any hours that are 3 apart will too.
Its important to remember that harmonic mixing only works if all of your tracks have accurately identified keys. I’d recommend taking a look at our review of Mixed In Key software specifically designed for this purpose.
 If you’re looking for hands on DJ tutorials in the form of videos I recommend you check these advanced mixing DJ Courses Online as they now have 3 courses you can access all for a single monthly subscription fee. You also get access to ALL of their other courses.